Cable Management Tips: How to Hide Desk Cables (2026 Guide)
Transform your messy desk into a clean workspace. Practical cable management tips, best products, and step-by-step guide to hiding cables under your desk.
A tangle of cables ruins even the best desk setup. You spent money on a nice monitor, keyboard, and chair—but your workspace still looks like a server room explosion.
Good news: cable management isn’t complicated or expensive. With $30-50 in products and an hour of work, you can transform your desk from chaos to clean.
This guide covers the practical approach—what actually works, what products are worth buying, and a step-by-step process to get it done.
The Cable Management Mindset
Before buying products, understand the goal: every cable needs a home, a path, and a place to hide excess length.
| Element | What It Means | Solution |
|---|---|---|
| Home | Where the cable connects | Keep connections accessible |
| Path | How it gets from A to B | Route along edges, out of sight |
| Excess | Extra cable length | Bundle and hide under desk |
Most cable mess comes from excess length. That 6-foot power cable only needs 2 feet, but the extra 4 feet creates chaos. If you own a 3D printer, you can print custom cable clips, under-desk trays, and routing brackets for pennies — see our guide to 10 desk upgrades you can 3D print for under $1.
Essential Cable Management Products
You don’t need dozens of products. These four handle 90% of situations.
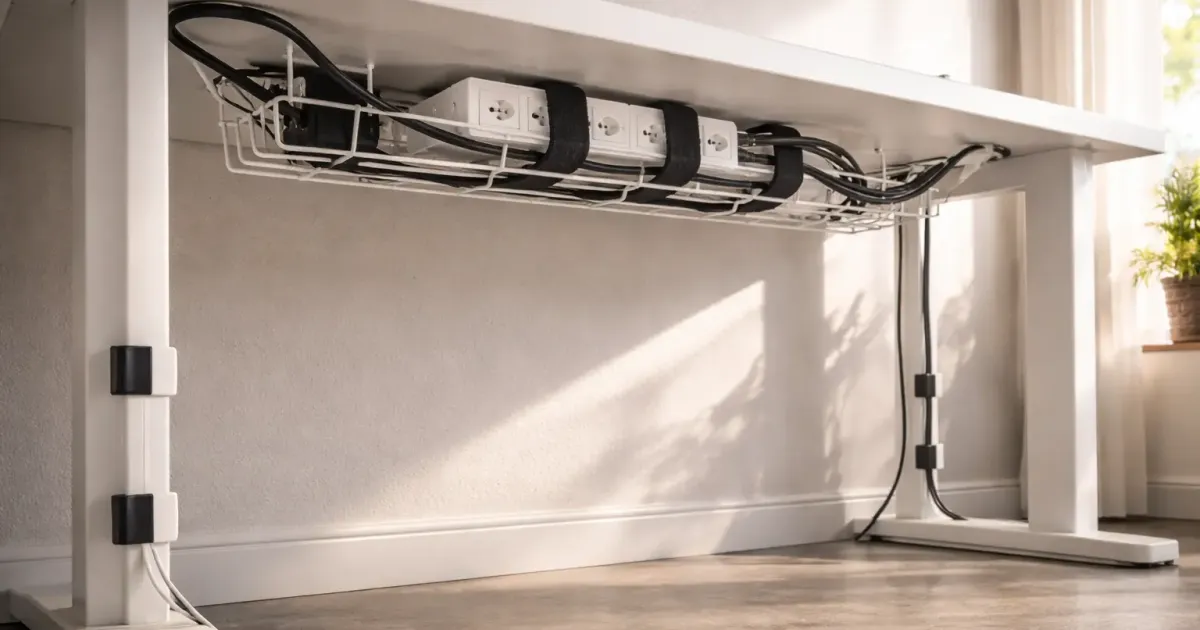
1. Under-Desk Cable Tray (~$20-40)
What it does: Holds your power strip and excess cables completely out of sight.
Best options:
| Product | Price | Best For |
|---|---|---|
| VIVO Cable Tray | ~$20 | Budget pick |
| Stand Up Desk Store Tray | ~$30 | Standing desks (doubles as privacy panel) |
| Fully WireTamer | ~$35 | Premium look |
Pro tip: Get a tray at least 16” wide. Your power strip plus adapter bricks need room.
2. Velcro Cable Ties (~$8-12 for 50-pack)
What they do: Bundle cables together into neat groups.
Why velcro, not zip ties:
- Reusable (zip ties are one-time use)
- Adjustable (add or remove cables later)
- Won’t damage cables (zip ties can cut into insulation)
Best option: VELCRO Brand ONE-WRAP ties—the original and still the best. A 50-pack costs ~$10 and lasts years.
3. Adhesive Cable Clips (~$8-15)
What they do: Route cables along surfaces—desk edge, wall, desk leg.
Types:
| Type | Best For |
|---|---|
| Single clips | Individual cables (charging cables, headphone cable) |
| Multi-channel clips | Multiple cables running same direction |
| 3M Command clips | Damage-free removal (rentals) |
Pro tip: Place clips every 12-18 inches along your cable path.
4. J-Channel Raceway (~$15-25)
What it does: Hides cables running along the underside of your desk.
Best options:
| Product | Length | Price |
|---|---|---|
| SimpleCord J-Channel | 5x 16” pieces | ~$15 |
| EVEO J-Channel | 6x 16” pieces | ~$20 |
| Delamu Cable Management | 4x 16” pieces + accessories | ~$18 |
Installation: Adhesive backing. Clean surface with alcohol, press firmly, wait 24 hours before loading with cables.
Standing Desk Cable Management
Standing desks need special consideration—cables must handle 12-20 inches of height change.
The Problem
Fixed cable routing breaks when the desk moves. Cables either:
- Pull tight and stress connections
- Hang loose and look messy at standing height
The Solution: Cable Management Spine
A cable spine is a flexible, articulated tube that expands and contracts with your desk.
Best options:
| Product | Price | Notes |
|---|---|---|
| VIVO Cable Spine | ~$15 | Budget pick, works well |
| Scandinavian Hub Spine | ~$25 | Cleaner look |
| Fully Cable Spine | ~$40 | Premium, color-matched |
Standing Desk Cable Rules
- Mount power strip to desk frame — Not the wall. It moves with the desk.
- Leave slack at connections — 6-12 inches at each end
- Use spine for desk-to-floor run — This is the moving section
- Keep adapters in under-desk tray — They don’t need to move
Step-by-Step Cable Management Guide
Set aside 1-2 hours. You’ll need: cable tray, velcro ties, clips, and a clean cloth with rubbing alcohol.
Step 1: Unplug Everything
Take a photo first (for reference), then unplug all cables. This is the only way to do it properly.
Step 2: Clean Surfaces
Wipe desk underside and edges with rubbing alcohol. Adhesive products need clean, dry surfaces.
Step 3: Plan Your Layout
Identify:
- Where your power strip will live (cable tray)
- Cable paths (along back edge, down desk leg)
- Connection points (where cables plug into devices)
Sketch it out. 5 minutes of planning saves 30 minutes of redoing.
Step 4: Install Cable Tray
Mount the tray toward the back of your desk, centered or slightly off-center toward your power outlet side.
For screw-mount trays: Use the provided screws. More secure, permanent. For clamp-mount trays: Attach to desk edge. Easy to remove later.
Step 5: Route Power First
- Put power strip in tray
- Run power cord along desk edge using clips
- Run it down one desk leg to the floor
- Connect to wall outlet
This is your “trunk line”—everything else connects to it.
Step 6: Bundle and Route Device Cables
For each device (monitor, laptop charger, desk lamp):
- Connect to power strip
- Coil excess cable length
- Secure coil with velcro tie
- Place coil in cable tray
- Route visible portion along desk edge with clips
Step 7: Handle Desktop Cables
Cables that reach your desktop (keyboard, mouse, charging cables):
- Route along back edge of desk
- Use desktop cable clips or grommets
- Keep only needed length on desktop surface
Step 8: Final Cleanup
- Tighten all velcro ties
- Press adhesive clips firmly
- Check all connections work
- Take a photo of your clean setup (motivation for maintenance)
Cable Management by Situation
Home Office Desk
Typical cables: Monitor, laptop charger, desk lamp, phone charger, speakers
Setup:
- Cable tray with power strip (under desk, back center)
- Route all power cables to tray
- Desktop charging cable with single clip at desk edge
- Total products needed: ~$40
Gaming Setup
Typical cables: Multiple monitors, PC, peripherals, RGB lighting, headset
Setup:
- Large cable tray (or two smaller ones)
- Cable raceway for PC-to-desk runs
- Dedicated USB hub mounted under desk
- Velcro ties for bundling thick cables
- Total products needed: ~$60-80
Standing Desk
Typical cables: Same as home office + height adjustment needs
Setup:
- Cable tray mounted to desk frame
- Cable spine for desk-to-floor
- Extra slack at all connection points
- Power strip moves with desk
- Total products needed: ~$50-70
Dual Monitor Setup
Typical cables: Two display cables, power for both, USB hub
Setup:
- Route both monitor cables together (bundle with velcro)
- Use monitor arm cable channels if available
- Single path from monitors to PC/laptop
- Keep cables same length for clean bundling
Common Mistakes to Avoid
1. Using Zip Ties for Everything
Zip ties are permanent. One cable change means cutting them all. Use velcro ties instead—they’re reusable and adjustable.
2. Buying Too Many Products
Start with the basics (tray, ties, clips). Add more only if needed. Most people overbuy cable management gear.
3. Ignoring Cable Length
The #1 cause of cable mess is excess length. Coil and secure extra cable—don’t let it hang loose.
4. Routing Cables Across Walking Paths
Floor cables are trip hazards. Route along walls, under rugs, or through cable raceways mounted to baseboards.
5. Forgetting Maintenance Access
Don’t bundle everything so tightly you can’t swap a cable. Leave some flexibility for future changes.
6. Skipping the Tray
An under-desk cable tray does 50% of the work. It’s the single best cable management purchase.
Quick Reference: What to Buy
Starter Kit (~$45)
| Product | Price | Qty |
|---|---|---|
| VIVO Cable Tray | ~$20 | 1 |
| VELCRO ONE-WRAP Ties (50-pack) | ~$10 | 1 |
| Adhesive Cable Clips (20-pack) | ~$8 | 1 |
| J-Channel Raceway (5-pack) | ~$15 | 1 |
This handles most desk setups.
Standing Desk Add-On (~$20)
| Product | Price | Qty |
|---|---|---|
| VIVO Cable Spine | ~$15 | 1 |
| Extra Velcro Ties | ~$5 | 1 |
Premium Upgrade (~$80 total)
| Product | Price | Qty |
|---|---|---|
| Fully WireTamer Tray | ~$35 | 1 |
| Scandinavian Hub Spine | ~$25 | 1 |
| VELCRO Ties (100-pack) | ~$15 | 1 |
| 3M Command Cable Clips | ~$12 | 1 |
For those who want the cleanest possible look.
The Bottom Line
Cable management doesn’t require expensive products or professional skills. With a $45 starter kit and an hour of work, you can transform a messy desk into a clean, professional workspace.
Start here:
- Get an under-desk cable tray (~$20)
- Get velcro ties (~$10)
- Get cable clips (~$10)
- Spend an hour on setup
That’s it. Your desk will look dramatically better, and you’ll wonder why you didn’t do it sooner.
Related Guides
- The Ultimate Desk Upgrade Guide — Complete workspace optimization
- Best Standing Desks Under $600 — Standing desk cable management included
- Best USB-C Docking Stations — One cable instead of many
- Best Monitor Arms — Many have built-in cable routing
- Best Office Chairs — Complete your setup
- Best Desk Mats — Some have built-in cable channels
Product recommendations verified March 2026. Prices may vary. This guide will be updated as better products become available.
Last updated: March 2026
Related Articles

7 Best WFH Monitors in 2026 — Tested & Ranked
I tested 7 monitors for working from home across every budget ($240–$1,020). Best 4K, ultrawide, and USB-C picks — plus one clear top choice for most people.

Best Monitor Arms 2026: Single & Dual Options Compared
Find the perfect monitor arm for your desk setup. We compare Ergotron, Amazon Basics, and VIVO—from budget to premium, single to dual monitor mounts.
Best Office Chairs for Long Hours (2026): Tested & Compared
Find the perfect office chair for all-day comfort. Herman Miller, Secretlab, Branch, and budget options compared with real specs and current prices.