3D Printing for Coffee Nerds: Espresso Mods & Organization
Stop overpaying for espresso gear. From planetary-gear WDT tools to aesthetic bean cellars, here is how to upgrade your coffee station with 3D printing.

If you’ve spent any amount of time in the home espresso rabbit hole, you know two things to be true: everything is expensive, and everything can be optimized. The intersection of coffee nerdery and 3D printing is a match made in heaven (or at least, in a very well-caffeinated workshop).
In the same way that a home barista will agonize over 0.1g of coffee or a 2-degree temperature swing, a 3D printing enthusiast will spend hours tweaking retraction settings and Z-offsets. When you combine these two obsessions, you get a coffee station that doesn’t just make incredible espresso, but looks and functions like a custom-engineered laboratory.
This guide explores the best 3D-printed mods for coffee nerds, from essential workflow tools to the ultimate organizational systems.
Why 3D Printing is the Barista’s Best Friend
The “prosumer” coffee market is notorious for high markups. A simple metal funnel can cost $40; a set of glass bean cellars with a wooden stand can easily clear $200. While these premium products are beautiful, 3D printing allows you to achieve 90% of the functionality (and often 100% of the aesthetics) for the cost of a few meters of filament.
But it’s not just about saving money. It’s about customization. Every espresso machine is different. Every grinder has its own quirks. 3D printing allows you to bridge the gaps between your gear, creating the “missing” parts that the manufacturers didn’t think of.
1. The Gateway Drug: The WDT Tool
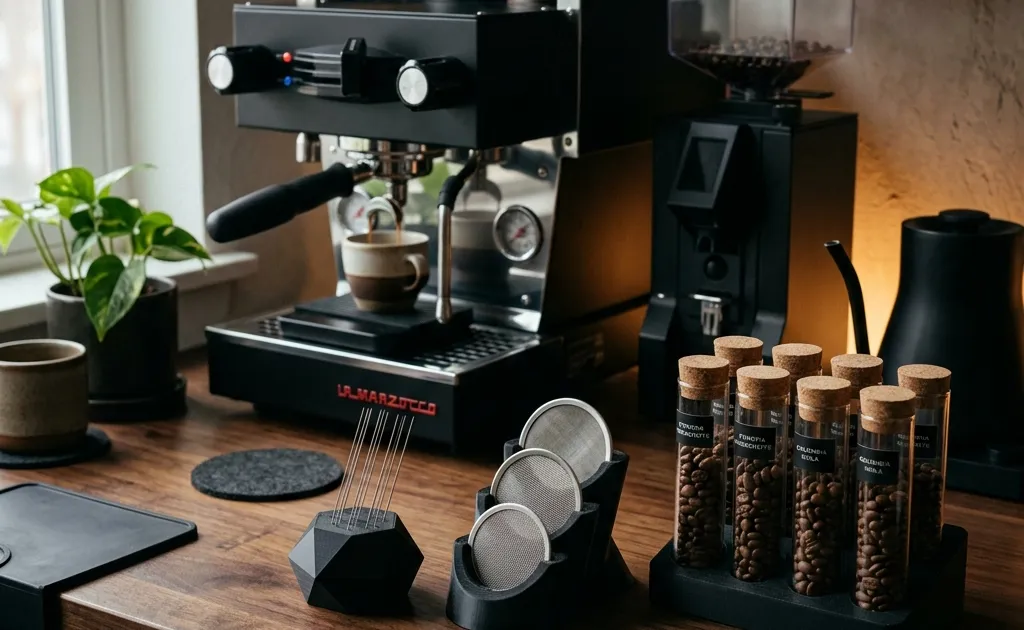
If you print only one thing for your coffee station, make it a WDT (Weiss Distribution Technique) tool.
For the uninitiated, a WDT tool is essentially a handle holding several thin needles (usually 0.3mm to 0.4mm). By stirring the coffee grounds in your portafilter, you break up clumps and ensure an even density across the puck. This prevents “channeling”,where water finds a path of least resistance, leading to a more balanced, sweeter extraction.
The Standard vs. The “Endgame” (Umikot)
While you can print a simple “clover” style handle for $0.05, the 3D printing community has taken this to the extreme. Enter the Umikot.
The Umikot is a planetary-gear-driven WDT tool. You place it on top of your portafilter and spin the top. As you spin, the internal gears move the needles in a specific, mathematically optimized pattern that perfectly distributes the grounds. It is a marvel of 3D-printed engineering and a satisfying mechanical ritual that feels right at home next to a high-end espresso machine.
Pro Tip: Use acupuncture needles (easily found on Amazon) for the best results. They are thinner and more flexible than standard wire, which prevents you from accidentally pushing the coffee around too much.
2. Aesthetic Organization: Bean Cellars
“Single dosing” is the practice of weighing out individual portions of coffee beans rather than keeping them in a hopper. This keeps the beans fresher and allows you to switch between different roasts effortlessly.
Commercial bean cellars, like those from Weber Workshops, are the “gold standard” of coffee aesthetics. They look like something out of a high-end chemistry lab. With 3D printing, you can recreate this look.
You can find numerous designs for Bean Cellar Stands that hold standard 50ml or 60ml glass centrifuge tubes.
- The Look: Print the stand in a matte black or “galaxy” dark grey filament to give it a premium, professional feel.
- The Utility: Most 3D-printed stands are modular, meaning you can print enough for 6, 12, or even 24 doses.
By using $15 worth of glass tubes from a lab supply store and $2 worth of filament, you can create a setup that looks indistinguishable from a $250 luxury product.
3. Workflow Efficiency: Portafilter Stands & Funnels
The workflow of pulling a shot involves several “messy” steps. 3D printing is perfect for creating the “landing pads” for your gear.
Portafilter Stands
Tamping on the edge of a counter is precarious. A 3D-printed portafilter stand provides a stable, level base for your portafilter while you tamp. This ensures that your tamp is perfectly level every time, which is critical for even extraction.
Dosing Funnels
If you’ve ever made a mess grinding coffee into a portafilter, you need a dosing funnel. Because portafilters come in various sizes (54mm for Breville, 58mm for E61 machines), you can print a funnel that fits your specific gear with zero “wiggle” room.
Advanced Mod: Many makers are now integrating magnets into their funnels. By pausing the print and dropping in small neodymium magnets, you can create a funnel that “snaps” onto your portafilter, making the whole process feel incredibly high-end.
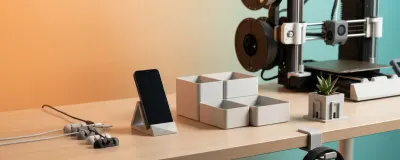
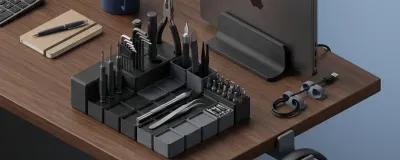
4. The Organization King: Gridfinity for Coffee
If you are a regular reader of this blog, you know our love for Gridfinity,the open-source organizational system created by Zack Freedman.
The coffee station is the perfect candidate for Gridfinity. You have dozens of small, specific tools:
- Puck screens
- Cleaning brushes
- Blind baskets
- Portafilter springs
- Tamper seats
By printing a Gridfinity baseplate for your coffee drawer or counter, you can create custom “bins” for every single accessory. There are already hundreds of “Gridfinity Coffee” modules available on Printables and MakerWorld. You can have a dedicated slot for your 58mm tamper and a perfectly sized hole for your cleaning brush. It turns a cluttered counter into a productive masterpiece.
5. Grinder Mods: Bellows and Single-Dose Hoppers
Many older or more affordable grinders are designed with large hoppers that hold a pound of coffee. For the coffee nerd, this is a problem: the coffee goes stale, and “retention” (coffee stuck inside the grinder) ruins the flavor of the next shot.
3D printing allows you to “mod” these grinders:
- Single-Dose Hoppers: Replace the giant plastic hopper with a small, sleek 3D-printed funnel.
- Bellows: Use a flexible filament like TPU to print a bellows. By pumping the bellows after grinding, you use a puff of air to clear out any retained coffee. This “zero retention” workflow is a game-changer for grinder consistency.
6. Material Science: Is it Food Safe?
This is the most common question in the 3D printing coffee world. The short answer is: No, but it depends on the use case.
The Risks
- Bacteria: 3D prints have microscopic “layer lines.” Even if the filament is food-safe, these gaps can trap coffee oils and moisture, becoming a breeding ground for bacteria over time.
- Lead: Some brass nozzles contain small amounts of lead which can leach into the print.
- Heat: PLA, the most common filament, has a low melting point. If you use it for a portafilter funnel and then put it near a hot group head, it will warp.
The “Safe” Way
- Non-Contact Items: Handles for WDT tools, stands for bean cellars, and organization bins never touch the coffee you drink. These are 100% safe to print in any material.
- Contact Items (Funnels, Tampers): If you are printing something that touches dry coffee grounds, the risk is lower, but still present.
- The Fix: The best practice is to coat any food-contact parts in a food-safe epoxy resin. This fills the layer lines and creates a smooth, glass-like surface that can be washed.
- Filament Choice: Use PETG or ASA for anything that will be near the espresso machine. These materials have a much higher heat deflection temperature than PLA and won’t warp when they get warm.
7. Advanced Projects: Wood and Metal
For the ultimate “Boredom at Work” project, look into specialty filaments.
- Wood-Fill Filament: This contains actual wood fibers. Once printed, you can sand it, stain it, and lacquer it just like real wood. It’s perfect for making custom knobs for your machine or a premium-looking base for your WDT tool.
- Weighted Prints: When printing a tamper stand or a base, use a high infill percentage or design a cavity into the model that you can fill with lead birdshot or sand during the print. This gives the object a “heft” that feels like a $100 solid steel accessory.
Where to Find the Best Models
If you’re ready to start printing, here are the three best places to look:
- MakerWorld: Currently the best place for Bambu Lab users. Search for “Espresso” or “Coffee” to find high-quality, pre-tuned profiles.
- Printables: The home of the “Coffee Design” movement. Look for users like Umikot or search for “Gridfinity Coffee.”
- Reddit (r/espresso and r/3dprinting): These communities are constantly sharing new “weird” mods, like 3D-printed drip tray extensions for scales or custom handles for the Flair 58.
Conclusion: The Ultimate Productive Procrastination
3D printing for coffee is the peak of productive procrastination. It allows you to spend your “bored” hours designing, printing, and iterating on tools that actually improve your daily ritual.
The next time you’re sitting at your desk, wondering what to do with that roll of Matte Black PETG, remember: your espresso machine is waiting for its next upgrade. Whether it’s a planetary-gear WDT tool or a simple Gridfinity bin for your puck screens, the intersection of these two worlds is limited only by your imagination (and your caffeine intake).
Happy printing, and may your extractions always be even.
Recommended Gear
- Filament: Bambu Lab Matte PETG
- Needles for WDT: 0.35mm Acupuncture Needles
- Glass Tubes: 50ml Centrifuge Tubes with Cork Stoppers
Related Articles
Related Articles
20 Best Functional 3D Prints That Are Actually Useful (2026)
Skip the toys, these 20 functional 3D prints solve real problems at your desk, home, and tech setup. Print times, difficulty, and STL sources included.
How to Convince Your Wife You Need a 3D Printer
Struggling with the 'approval process' for a 3D printer? Here is the roadmap to winning the argument with logic, aesthetics, and practical value.
10 Practical Desk Upgrades You Can 3D Print for Under $1
Transform your workspace from a cable-cluttered mess to a productivity powerhouse with these 10 cheap, fast, and functional 3D prints.