
OrcaSlicer Guide (2026): Best Features, Setup & Tuning
Is OrcaSlicer better than Cura and PrusaSlicer? Discover built-in calibration, multi-plate slicing, and optimal print settings in our complete 2026 guide.

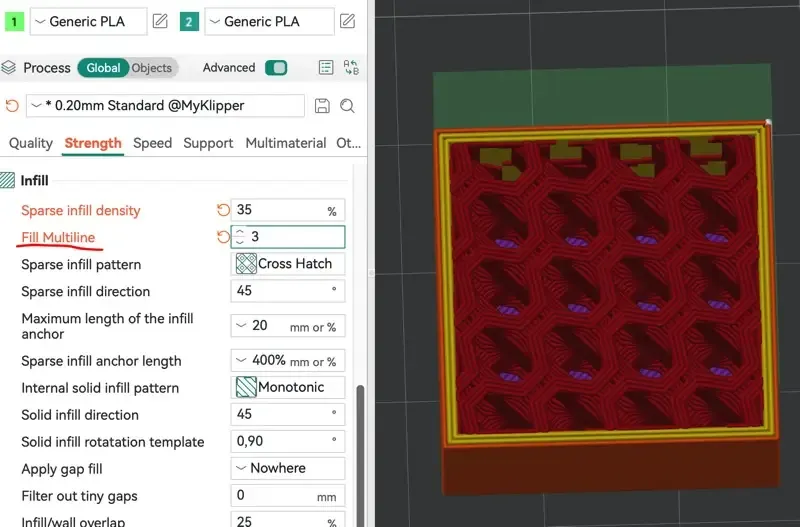
OrcaSlicer is a free, open-source slicer that merges PrusaSlicer’s engine with Bambu Studio’s interface and adds two things neither has: a built-in calibration suite and a clean multi-plate workflow. The calibration suite is the reason to switch. Instead of hunting for test models and guessing at flow or temperature, you run a numbered sequence from the menu and read the result off the print. If Cura or PrusaSlicer already work for you, this guide shows exactly what you would gain before you install anything.
If you’ve been 3D printing for more than a week, you’ve likely settled into a routine with either Cura or PrusaSlicer. They are the titans of the industry, and they work well.
But there’s a new contender that’s rapidly becoming the daily driver for power users and hobbyists alike: OrcaSlicer.
Leveling up your 3D printing setup? Dive into our complete 3D Printing Guide for Beginners covering printer calibration, slicers, and essential tools.
Born as a fork of Bambu Studio (which itself was based on PrusaSlicer), OrcaSlicer takes the best parts of the modern Bambu interface and adds the deep, open-source customizability that PrusaSlicer fans love.
In this guide, we’ll explore why you might want to switch, its killer features, and how it compares to the old guard.
Quick Picks: Slicer Comparison at a Glance
| Slicer Software | License & Price | Native Calibration Suite | Multi-Plate Management | Best Use Case |
|---|---|---|---|---|
| OrcaSlicer | Open Source (Free) | Built-in 1-Click Tests | Native Visual Plates | Best overall for modern FDM printers |
| Bambu Studio | Open Source (Free) | Good (Bambu machines) | Excellent | Bambu Lab printer ecosystems |
| PrusaSlicer | Open Source (Free) | Basic manual | Manual plate duplication | Original Prusa & custom rep-rap rigs |
| UltiMaker Cura | Open Source (Free) | Via Marketplace Plugins | Single-plate focus | Older Cartesian printers & beginners |
Why Use OrcaSlicer?
The “big two” (Cura and PrusaSlicer) are great, but OrcaSlicer was built to solve specific friction points that have existed for years.
1. The Built-in Calibration Suite
This is the “killer app” of OrcaSlicer. In other slicers, if you want to calibrate a new filament, you have to download external STL files, guess at settings, or install third-party plugins.
In OrcaSlicer, calibration is a top-level menu. With two clicks, you can generate:
- Temperature Towers
- Flow Rate Tests
- Pressure Advance (Linear Advance) Tests
- Retraction Tests
- Max Volumetric Speed Tests
It handles all the G-code changes automatically. You just print the test, look at the results, and enter the value into your filament profile.
2. Multi-Plate Management
If you’re printing a project with 20 different parts, Cura and PrusaSlicer can get messy. OrcaSlicer (inheriting the Bambu Studio workflow) allows you to have multiple build plates in a single project file. You can organize your parts by plate, color, or material and switch between them instantly.
3. Modern, High-Performance UI
OrcaSlicer feels like a modern app. It’s built on a C++ core that is significantly faster and more responsive than Cura, especially when handling high-polygon models or complex “fuzzy skin” layers.
Key Features That Make a Difference
OrcaSlicer (orcaslicer.com)
- Arachne Engine by Default: Leveraging the revolutionary Arachne engine for better thin-wall handling and sharper details.
- Klipper-Native Support: If you run Klipper firmware (like on a Voron or a modded Ender), OrcaSlicer offers built-in support for Klipper features like G2/G3 arcs and direct control via the interface.
- Precise Wall Control: Better algorithms for “inner-outer-inner” wall ordering, which significantly improves dimensional accuracy for mechanical parts.
- Sandwich Mode: A unique infill/wall strategy that makes parts stronger while using less material.
OrcaSlicer vs. The Competition
| Feature | OrcaSlicer | Cura | PrusaSlicer |
|---|---|---|---|
| UI Vibe | Modern / Apple-like | Corporate / Functional | Industrial / Traditional |
| Calibration | Built-in (Excellent) | Plugin-based (Good) | Limited (Manual STLs) |
| Multi-Plate | Native Support | Not Available | Not Available |
| Efficiency | Very High | Medium | High |
| Learning Curve | Medium | Low | Medium |
Transitioning from Cura
If you’re moving from Cura, you’ll notice that OrcaSlicer groups settings differently. Instead of one long sidebar, settings are divided into tabs (Global, Objects) and sub-tabs (Quality, Strength, Speed, Support). It takes about an hour to get used to the location of settings, but the logic is very sound.
Tips for Specific Printers
OrcaSlicer shines with its printer-specific profiles, but here are some extra tips based on popular models:
Bambu Lab (A1 Mini, P1S, X1C)
OrcaSlicer was literally born from Bambu Studio, so compatibility is excellent. You get native LAN-mode printing, AMS filament management, and live camera monitoring. Many Bambu users prefer OrcaSlicer over the official studio for its extra calibration tools. See our Bambu A1 Mini vs Creality Ender 3 comparison for more on these printers.
Creality (Ender 3 V3, K1, K1 Max)
For stock Creality printers, load the matching profile and you’re good to go. If you’ve installed Klipper on an older Ender 3, switch to a Klipper-specific profile to unlock features like pressure advance and input shaping directly from OrcaSlicer.
Prusa (MK4, Mini+)
PrusaSlicer profiles import cleanly into OrcaSlicer. Your filament and print settings carry over, so the transition is painless. The main benefit: OrcaSlicer’s calibration suite replaces the manual test-print workflow that PrusaSlicer requires.
Voron and Other Klipper Machines
This is where OrcaSlicer really excels. Native Klipper support means you can send print jobs directly to your printer via Moonraker, use G2/G3 arc commands for smoother curves, and manage pressure advance per-filament.
Common Issues and Fixes
| Problem | Solution |
|---|---|
| Slicer crashes on launch (macOS) | Right-click → Open to bypass Gatekeeper, or allow in Security settings |
| Printer not detected | Check IP address, enable LAN mode on Bambu printers, or verify Moonraker URL for Klipper |
| Profiles missing after update | OrcaSlicer stores profiles separately, re-select your printer in settings after major updates |
| Slow slicing on large models | Enable “Use GPU for slicing preview” in preferences; close other GPU-heavy apps |
| Inconsistent first layers | Run the built-in “Flow Rate” and “First Layer” calibration tests before tuning manually |
How to Get Started
Getting started with OrcaSlicer is simple, and it won’t interfere with your existing slicer installations.
- Download: Head to the OrcaSlicer GitHub Releases and download the version for your OS (Windows, Mac, or Linux).
- Run the Setup: Since it’s community-driven, macOS users might need to right-click and “Open” to bypass security warnings the first time. (See our best free macOS software guide for more open-source tools worth installing.)
- Choose Your Printer: OrcaSlicer comes pre-loaded with hundreds of high-quality profiles for Creality, Prusa, Voron, Bambu Lab, RatRig, Anycubic, and many more.
- Run a Calibration: If you want to see the magic immediately, go to the “Calibration” menu at the top and run a “Flow Rate” test.
Conclusion: Is It Time to Switch?
If you are a beginner who just wants to click “Print” and walk away, Cura is still a fantastic choice with a massive support community.
However, if you feel like you’ve “outgrown” your current slicer, or if you find the calibration process for new filaments to be a chore, OrcaSlicer is a revelation. It combines the polish of commercial software with the power of open-source engineering.
The future of slicing is community-driven, and right now, the community is building OrcaSlicer.
Ready to design your own parts for OrcaSlicer? Check out our Best CAD Software for 3D Printing guide. Need help with prints not sticking? See Every Fix for Bed Adhesion. Want to print with mixed filaments? Our Bambu Studio filament mixing guide walks through the OrcaSlicer-equivalent workflow.
Related Articles
6 Best CAD Software for 3D Printing (2026 Free & Paid)
Discover the 6 best CAD software for 3D printing in 2026. Compare Tinkercad, Fusion 360, Onshape, Blender, FreeCAD, and Plasticity for custom 3D prints.

The Real Dangers of 3D Printing: Fumes, Fires & Safety
Understand the hidden hazards of 3D printing. Learn about VOCs, ultrafine particles, fire risks, resin toxicity, and essential home workshop safety.

Printing with TPU & Flexible Filaments: Beginner Guide
Everything you need to know about 3D printing with TPU and flexible filaments in 2026. From printer settings to drying methods and preventing jams.