
Sesame Robot: The Most Adorable DIY Quadruped You Can 3D Print
Build the Sesame Robot, an open-source 3D-printed quadruped with personality, OLED eyes, and WiFi control. Full BOM, print settings, and build guide inside.

If you’ve been following our 3D Printing Guide for Beginners, you’ve probably reached the stage where you’re tired of printing static “dust collectors.” You want something that moves, something interactive, and, let’s be honest, something that looks cool on your desk.
Enter the Sesame Robot.
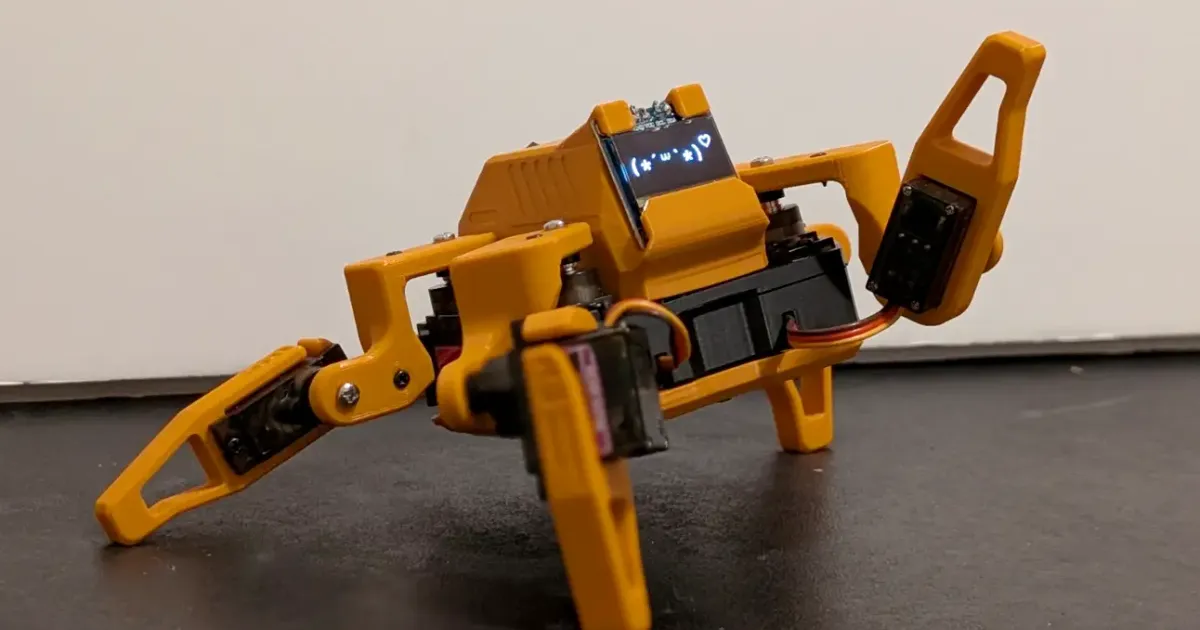
Created by Dorian Todd, Sesame is an open-source, 8-servo quadruped robot that has taken the maker community by storm. Featured on Hackaday, Hackster.io, and Adafruit, it’s not just a walking machine, it’s a personality-driven companion designed to be accessible to everyone.
What Makes Sesame Special?
Most quadruped robots are either incredibly expensive (thousands of dollars) or extremely complex to build. Sesame hits the “goldilocks” zone of robotics:
- Affordability: All electronics for roughly $50–$70.
- Expressiveness: A small SSD1306 OLED display acts as Sesame’s face, allowing it to blink, look around, and express emotions. Hackaday described it as having “all the joy and verve of a new puppy.”
- Ease of Printing: 11 parts designed for FDM printers. Only one part (the top cover) needs supports. If you’ve mastered your Cura settings or OrcaSlicer setup, you’ll have no trouble getting clean, functional parts in PLA.
Sesame vs Other DIY Robots
Not sure if Sesame is the right project? Here’s how it compares to other popular builds:
| Feature | Sesame | SpotMicro | Otto Robot |
|---|---|---|---|
| Type | Quadruped | Quadruped | Biped |
| Cost | ~$50-70 | ~$150-250 | ~$30-50 |
| Servos / DOF | 8 (2 per leg) | 12 (3 per leg) | 4 |
| Controller | ESP32-S2 Mini | Raspberry Pi 4 | Arduino Nano |
| Control | WiFi web UI + API | ROS + Python | Bluetooth/USB |
| Personality | OLED face + emotes | Minimal | Basic sounds |
| Build Difficulty | Moderate | Advanced | Easy |
Sesame occupies the sweet spot: more capable and expressive than Otto, far more accessible (and cheaper) than SpotMicro. If you want a quadruped that actually feels alive without needing a robotics degree, this is it.
The Brains: ESP32 Power
At the heart of Sesame is the ESP32-S2 Mini, cheap (~$5), powerful, and WiFi-enabled out of the box.
Because it has WiFi, you don’t just program it and hope for the best. Once flashed, Sesame creates its own WiFi network. Connect to it, open 192.168.4.1 in your browser, and you get a full control panel: walk, turn, sit, dance, and adjust servo parameters in real time.
Want to go further? Script complex movements using Sesame Studio, a Python desktop app that lets you visually compose animations frame by frame. Set servo angles for each joint, add delays, and export the code directly to Arduino IDE. No other hobby quadruped has a dedicated animation tool like this.
There’s even a Sesame Companion App that adds AI-powered voice control via Google Gemini, complete with speech recognition and a personality the creator describes as having “comedic timing and occasional sarcasm.”
Full Bill of Materials
Here’s exactly what you need to order:
| Component | Qty | Estimated Price | Link |
|---|---|---|---|
| MG90S metal-gear micro servos | 10 (8 needed + 2 spares) | ~$15-20 | Link |
| Lolin ESP32-S2 Mini | 1 | ~$4-6 | Link |
| 0.96” SSD1306 I2C OLED display | 1 | ~$3-5 | Link |
| 3S 450mAh LiPo battery + XT30 | 1 | ~$8-12 | Link |
| Buck converter (5V/3A) | 1 | ~$2-3 | Link |
| KCD1 rocker power switch | 1 | ~$1 | Link |
| Small protoboard (~5x7cm) | 1 | ~$1-2 | Link |
| Wire kits (22AWG + 30AWG silicone) | 2 | ~$5-8 | Link |
| M2 x 5mm self-threading screws | ~40 | ~$2-3 | Link |
| M2.5 x 5mm machine screws | ~10 | ~$1-2 | Link |
| Misc (heat-shrink, zip ties, headers, solder) | , | ~$5-8 | |
| PLA filament (~200-300g) | , | ~$3-5 | Link |
| Total | ~$50-70 |
Tip: Buy the MG90S servos in a 10-pack. Dead-on-arrival servos aren’t uncommon with budget brands, and having spares saves you a week of waiting.
Recommended Print Settings
The parts are designed to be printer-friendly. Here’s what works best:
| Setting | Value |
|---|---|
| Material | PLA or PLA+ |
| Infill | 8-10% |
| Infill pattern | Honeycomb |
| Wall loops | 2 |
| Supports | Only the top cover (all other 10 parts: none) |
| Total parts | 11 (8 leg joints, internal frame, top cover, bottom cover) |
The latest “Enclosed v91” design variant features magnetic hat mounts, covered display wires, and multicolor detail support if your printer handles that. Use your slicer’s auto-orient tool for correct joint orientation.
New to dialing in your slicer? Check our Cura settings guide or OrcaSlicer guide for the fundamentals. And if you’re still picking a filament, our PLA vs PETG vs ABS comparison explains why PLA is the right call for this project.
How to Build It (5 Phases)
The full build takes about 5-8 sessions spread over a weekend or two. Here’s the overview:
Phase 1: Print and Prep
Print all 11 parts. While they’re printing, pre-test every servo with a servo tester, catching a dead unit now saves hours of troubleshooting later.
Phase 2: Electronics and Wiring
Solder the power rails and buck converter first. Route signal wires and label every servo lead S0-S7 with tape flags. This is the single most important step, swapped servo plugs are the #1 cause of calibration failures.
Phase 3: Pre-Assembly
Press-fit servo horns into the femur shells, but do not attach them to motor shafts yet. Install the OLED into the top cover. Press-fit the rocker switch.
Phase 4: Main Assembly
Install motors into the frame using the “rotate-in” technique from the docs. Route wires into the recessed channels. Lower the electronics into the cavity with the USB port facing the rear. Secure with screws.
Phase 5: Calibration and Firmware
This is where patience pays off. Flash the sesame-motor-tester.ino debugging firmware first. Command all motors to 90 degrees, then attach joints one at a time. Verify the reference stance before moving on.
Once calibrated, flash the production firmware, connect to the “Sesame-Controller-BETA” WiFi network, and watch your robot take its first steps.
Common Issues and Fixes
A few gotchas the documentation warns about:
- Hip motors crash at max angle: Data wires connected to wrong headers, easy to accidentally reverse left/right.
- Foot motors drive into the bottom cover: Servo horn installed in the wrong direction. Pull it off, command the opposite extreme, reinstall pointing up, and re-center at 90 degrees.
- Servo jitter during movement: Increase
motorCurrentDelayin the web settings to stagger servo bursts. The default 20ms works for most builds. - Stripped servo gears: Never run calibration with joints already attached. A misaligned horn can stall and strip a gear instantly.
- Upload fails: Hold the BOOT button during upload. Try a different USB cable if it still doesn’t work.
Why You Should Build One
3D printing is at its best when it merges with other disciplines like electronics and programming. Sesame is the perfect “next step” project after you’ve printed your first functional objects and avoided the beginner mistakes. It teaches you about power management, servo calibration, and kinematic movement, all while resulting in a robot that feels genuinely alive.
Plus, watching it do a little “happy dance” on your desk after you’ve spent a weekend building it is one of the most rewarding feelings in the maker hobby.
Ready to start? Head over to the Sesame Robot GitHub repository, warm up your print bed, and check the best sites for free 3D models for more project inspiration.
For more 3D printing projects and guides, visit our 3D Printing Guide.
Related Articles

RFID Record Player: Play Spotify with Physical Vinyl
Build an RFID Record Player that plays Spotify with physical vinyl cards. A complete DIY guide using Raspberry Pi, NFC tags, and 3D printing.
10 Practical Desk Upgrades You Can 3D Print for Under $1
Transform your workspace from a cable-cluttered mess to a productivity powerhouse with these 10 cheap, fast, and functional 3D prints.
15 Must-Have 3D Printing Accessories for Every Maker
The 15 best 3D printing accessories from calipers and scrapers to deburring tools, filament dryers, and fire safety. The complete maker's toolkit.